Setting fishing boundary lines, tips to prepare you for the season
 Setting Up HomePort
Start up HomePort on your PC. If you are using an SD card to transfer these new boundary lines to your chartplotter, plug the SD card into the PC. Otherwise, if you are using a GPS handheld, attach it to the PC via USB. You should see your SD card or handheld device appear on the HomePort screen under the Library list in the upper left of the window.
Creating A Boundary Line
1. Create a new folder for your boundary line by clicking File/New/Folder in <your device name here>. Name the folder anything, for example – “fishing lines”. Note: if you create the new folder under the Library section, it will stay on your PC and will not be on the SD card when you transfer it to the chartplotter. You can do it that way to keep a copy of your track/boundary on your PC. When finished creating the track, just drag it to the SD card before shutting down HomePort.
2. Click on the folder you just created so it is highlighted. Start a new track in your new HomePort folder by clicking File/New/Track.
3. Click on the chart at each point of the boundary line you are recreating. Don’t worry about getting each point exact yet as we’ll fine tune them later. Note: You can find the lat/lon of the mouse pointer position in the lower left corner of HomePort. You can change the Lat/Lon format by clicking Tools/Options.
 4. Fine tune each turn point of your track line with the Move Point tool (as shown circled in red to the left).
a. Click on each turn point on the track. Hold down the left mouse button to drag the point around. Zoom in quite far to make it easier to get the exact lat/lon specified in the regulation. If you have a mouse with a scroll wheel use it to quickly zoom in and out.
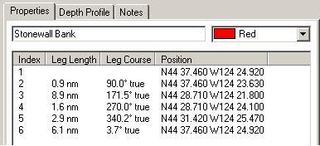
5. When you finish fine tuning each turn point use the Properties tab below the chart in HomePort to name the route, set the color and to double-check each point for accuracy.
Transferring Tracks To Your Chartplotter
Shut down the HomePort application and eject the SD card or disconnect your handheld from the PC.
If you are transferring to a chartplotter take the SD card to your boat. Plug the SD card into the chartplotter. Import the new track via Home/Information/User Data/Data Transfer/Card/Merge From Card. Select the data to import and press "Merge From Card". The new boundary line track should now be drawn when viewing the navigation or fishing charts.
If you are using a handheld GPS, you can display the boundary line track by going to the main menu (press the Menu button twice), Track Manager, then scroll down to the track name and press the Enter button. Scroll down to the Show On Map button and select it. The track will be drawn when viewing the chart.
The post Setting fishing boundary lines, tips to prepare you for the season appeared first on Garmin Blog.
Sample Block Quote
Praesent vestibulum congue tellus at fringilla. Curabitur vitae semper sem, eu convallis est. Cras felis nunc commodo loremous convallis vitae interdum non nisl. Maecenas ac est sit amet augue pharetra convallis nec danos.
Sample Paragraph Text
Praesent vestibulum congue tellus at fringilla. Curabitur vitae semper sem, eu convallis est. Cras felis nunc commodo eu convallis vitae interdum non nisl. Maecenas ac est sit amet augue pharetra convallis nec danos dui.
Cras suscipit quam et turpis eleifend vitae malesuada magna congue. Damus id ullamcorper neque. Sed vitae mi a mi pretium aliquet ac sed elitos. Pellentesque nulla eros accumsan quis justo at tincidunt lobortis denimes loremous. Suspendisse vestibulum lectus in lectus volutpat, ut dapibus purus pulvinar. Vestibulum sit amet auctor ipsum.


