How To: Progression Runs
Please enjoy the following guest blog written by Garmin Ambassador Carlee @carleemcdot. For more blogs by Carlee, check-out her blog www.carleemcdot.com
Now I want to start off by saying I am NOT, I repeat, NOT a running coach or even a seasoned runner. With that out of the way, I have had some people ask me about my progression runs, so I thought I would do a post about them. This is NOT necessarily the “proper” way to do one (but I really don’t know since I’ve never done any research on the topic), but it is what works for me, so I figured I’d let you know and maybe it’ll work for you…
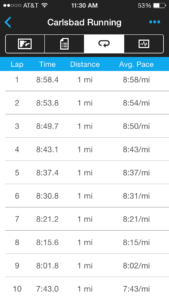
First – what is a progression run? Basic definition – start slow, finish fast. I break it down by miles, so I am attempting to run every mile faster than the previous one (also considered ‘Negative Splits’).
Next – why do a progression run? Experts say that these types of runs can push your endurance limits, build stamina, encourage mental patience (due to the slow start and restraint needed), and teach your body to run on tired legs.
Now that the nitty gritty is out of the way – let’s talk about what this actually looks like in my training.
I have had a couple people ask me if I choose the pace I run each mile at during a progression run. For me, I do not. Honestly, it depends on the distance I am running and how reserved I can run the first mile at. If I am running a shorter progression run (say 5 or 6 miles), I will try to run each consecutive mile between 10 and 20 seconds faster than the previous one. If I am running a longer progression run (say 8 or 10 miles), I normally shoot for increasing my pace between 5 and 10 seconds each mile. And obviously the pace at which I run my first mile has a LOT to do with how the run goes. The “slower” I run that first mile, the more wiggle room I have to work with to get future miles faster, but the “faster” I go, the closer together my pace tends to be throughout the run (seeing as my little legs can only go so fast…).
We live in a somewhat hilly area. I have a 5 mile loop from our house to a local park and back. Heading to the park is decently uphill, which means heading home is more of a gradual downhill. This works GREAT with some progression runs because the uphill at the beginning forces me to slow my pace a bit and the downhill at the end allows gravity to help me out when my legs are getting tired. Maybe this is “cheating” a bit, but at least it gets my body used to the idea.

I think this was the first time I have EVER seen a 6 in the front of one of
my mile times… I guess you can say the downhill helped a bit.
Not all of my runs are on hills though. I find for progression runs I can’t stop – meaning if I need to carry hydration with me or run a route that doesn’t have traffic signals, that is what I have to do. If I end up having to stop at drinking fountains or wait for lights to change it messes with my rhythm and I have a much harder time keeping with the progression.

This one was done down at the beach. There is a bike/ pedestrian lane
along “the strand” and through the harbor, which makes for great
running routes (not to mention the sea breezes keep it cool).
Also, I prefer to run my progression runs on out-and-back routes – meaning you run in one direction for half the distance and then turn around and run the same route backwards for the other half. The reason I like this is because once I flip around I know I can start opening up my speed. For me, the first half of the run, although it is slower, is normally more difficult for me. I am having to reign myself in which can be tough. By the time I am half way done I know “the faster I go, the faster I get done” and can take off a bit more.
Another tip is to keep the route in mind when planning out your progression run. For example, during a recent 10 mile progression run, there is a decent “dip” (what I consider a backwards hill because the downhill comes first, followed by the uphill) around mile 7. With this in mind, I try to run mile 6 as close to mile 5’s pace because I know mile 7 will be tougher due to the elevation changes.
Throughout the run, I try not to be too focused on my pace – normally only looking at my watch every half mile or so. I know that probably seems like the opposite of what you should do, since this run is based around pace, but I guess I am trying to train my brain to work on muscle memory. Most of the time I attempt to feel as though I am continually going faster (and then double check my watch just to make sure the numbers are correlating to the perceived increase in intensity). For the last mile I normally try and keep the pace the same as the previous mile for the first half and then go just about as fast as I can for the last quarter to half mile at the end – might as well give it all you’ve got, right?! These workouts are difficult and by the time I finish I know my body couldn’t do another mile faster than the one I finished with.
I’m not sure if this was helpful at all, so if it wasn’t, I’m sorry. Like I said at the beginning, I am not a running coach (or even a qualified runner… maybe I just play one on Instagram ;)). Lately I have really been enjoying the progression runs and I guess since I have been doing them frequently people see the times and ask about them. Hopefully this gives you an idea of how I do them (and encourages you to give them a try if they aren’t in your normal running routine). My BIG TIP and main focus is reminding myself to START SLOW so that I can build speed throughout the run. If I start too fast I know I won’t be able to continue to speed up.
The post How To: Progression Runs appeared first on Garmin Blog.
Sample Block Quote
Praesent vestibulum congue tellus at fringilla. Curabitur vitae semper sem, eu convallis est. Cras felis nunc commodo loremous convallis vitae interdum non nisl. Maecenas ac est sit amet augue pharetra convallis nec danos.
Sample Paragraph Text
Praesent vestibulum congue tellus at fringilla. Curabitur vitae semper sem, eu convallis est. Cras felis nunc commodo eu convallis vitae interdum non nisl. Maecenas ac est sit amet augue pharetra convallis nec danos dui.
Cras suscipit quam et turpis eleifend vitae malesuada magna congue. Damus id ullamcorper neque. Sed vitae mi a mi pretium aliquet ac sed elitos. Pellentesque nulla eros accumsan quis justo at tincidunt lobortis denimes loremous. Suspendisse vestibulum lectus in lectus volutpat, ut dapibus purus pulvinar. Vestibulum sit amet auctor ipsum.


