Chet’s Corner: Transferring Routes to a zumo 550
1. The first thing you will need to do is install the MapSource
City Navigator program that came in the box. This is a very simple
process. Once you are done with that, plug the zumo into the computer
and open up MapSource.
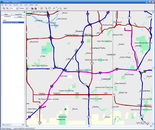
You can create the route inside of MapSource and customize it
completely to your liking. Once you have finished, the route will look
something like this on the screen. If you click on the image below,
you can make it bigger so you can see things in more detail. There are
black squares along the pink route line. Those are the via points that
denote where the route will go. Remember those points as I will
reference them again later.

2. You will need to transfer the route to the device by clicking
"Transfer" and then "Send to Device". This will put the route onto the
zumo and then you can unplug the zumo from the computer. It will tell
you that new data was found and it will walk you through importing that
route to the device.
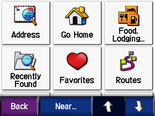
3. Once the route is on the zumo, tap on "Where To?" and then tap
on "Routes" in the bottom right hand corner of the screen. On the
"Routes" Menu, you will see your route listed. 

4. Tap on your route and you will be taken to a screen that has an
option labeled "Map". This is there so you can see the entire route on
the screen to see the exact direction it will take. On this map view,
there are flags that denote the via points that were mentioned
earlier. You can look at these to make sure they are in the same place
that they were on the MapSource program.

5. To follow that route, tap on "Back" and then tap the large green
button that says "GO!". If you are not located at the point the
route starts on, the device will route you to that point and then
proceed with the route. If you get off the route, the device will
either re-calculate you to get you back to the route line or it will
recalculate the route to the next Via Point in the route.
6. If you would like to have more control over the route, instead
of tapping on "GO!", you can tap on Edit and you will have many
different options for the route.

7. If you choose to manually reorder the route, this is what the screen will look like on the unit:


Any other questions?
The post Chet’s Corner: Transferring Routes to a zumo 550 appeared first on Garmin Blog.
Sample Block Quote
Praesent vestibulum congue tellus at fringilla. Curabitur vitae semper sem, eu convallis est. Cras felis nunc commodo loremous convallis vitae interdum non nisl. Maecenas ac est sit amet augue pharetra convallis nec danos.
Sample Paragraph Text
Praesent vestibulum congue tellus at fringilla. Curabitur vitae semper sem, eu convallis est. Cras felis nunc commodo eu convallis vitae interdum non nisl. Maecenas ac est sit amet augue pharetra convallis nec danos dui.
Cras suscipit quam et turpis eleifend vitae malesuada magna congue. Damus id ullamcorper neque. Sed vitae mi a mi pretium aliquet ac sed elitos. Pellentesque nulla eros accumsan quis justo at tincidunt lobortis denimes loremous. Suspendisse vestibulum lectus in lectus volutpat, ut dapibus purus pulvinar. Vestibulum sit amet auctor ipsum.

